Saturday, 20 April 2013

ADF: Calculating total sum of Salary of all the employees in a Department using Groovy expression.

If there is a condition in which you have to calculate the sumtotal of a VO field in ADF (like if you want to calculate the sum of salary of all the employees of a Department) , then better of all option is to use groovy expression to calculate the sum.
Here is an application which is used to calculate the sum of salary of all the employees of a given department.

  1. Create a new ADF application and create database connection with HR Schema. Generate the Business components. Here am using two tables ie Employee and Departments.
  2. Now create a ViewLink between Department and Employee using DepartmentId as foreign key.

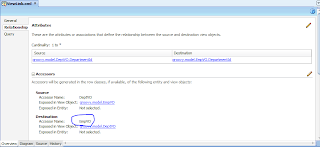
  3. Use the Accessor to get the salary from the employee table to department table.
  4. Then create a transient variable in the DepartmentVO, and then assign value to it using the expression

    EmpVO.sum("SalTot");
  5. Here is an screen shot. The name 'EmpVO' is the name of the Accessor of the Employee table in the deptToEmpViewLink.
  6. Then run the AM to see the Application.
  7. You can find the ADF application at Groovy.rar

Using resource bundle in Oracle ADF. Labels and Messeges based in different Language in ADF

Hi,


In ADF programming we can use xml file to get resource names such as labels, messages,etc instead of writing them hard coded in the code. This helps us in making the software multilingual and makes one point control on the labels and messages that are shown in the form. So if the requirement is to change the language of messages and labels in the application then you can use it in this way.

1. Create an ADF FUSION WEB APPLICATION.
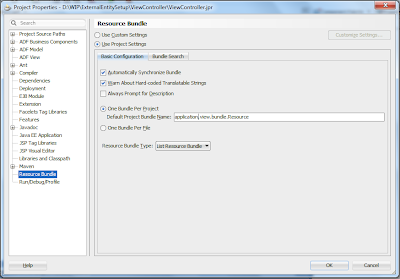
2. Go to the properties of the ViewController and do the changes as shown in the figure.


3.Now go to faces-config.xml file in your application.Go to the Applications tab. There you will see a segment named Resource Bundle. There you have to give the path of your resource file and give a name,this name is used to access the bundle in the application. Here i named it as 'bundle'.


4. Create a text Resource by simply selecting any component on the form on the as shown below.
5. Select the component->go to labels in property inspector-> go to properties menu -> then select the 'Select Text Resource'.When you will select it Resource.java file will be created in the ViewController.
6. After that go to the properties of Model in the project. And make the entries as shown in the figure.Then click on the next tab i.e. Bundle search and click add button and copy and paste the same path as in ViewController Resource properties.It is shown in the figure.


7. Then Open the Resource.java file and override it with the given code.

import java.util.ListResourceBundle;
import java.io.File;
import java.util.ListResourceBundle;
import javax.xml.parsers.DocumentBuilder;
import javax.xml.parsers.DocumentBuilderFactory;
import org.w3c.dom.Document;
import org.w3c.dom.Element;
import org.w3c.dom.Node;
import org.w3c.dom.NodeList;
public class Resource extends ListResourceBundle {
   public  Resource(){
               for (int i = 0; i < 5000; i++) {
                       contents[i][0] = "";
                       contents[i][1] = "";
                   }
               }
           
     private static final Object[][] contents = new Object[5000][2];
       public Object[][] getContents() {
           try {
               File file = new File("D:\\Resource\\Resource.xml");
               DocumentBuilderFactory dbf = DocumentBuilderFactory.newInstance();
               DocumentBuilder db = dbf.newDocumentBuilder();
               Document doc = db.parse(file);
               doc.getDocumentElement().normalize();
               NodeList nList = doc.getElementsByTagName("label");
               for (int temp = 0; temp < nList.getLength(); temp++) {
                   Node nNode = nList.item(temp);
                   if (nNode.getNodeType() == Node.ELEMENT_NODE) {
                       Element eElement = (Element)nNode;
                       contents[temp][0] = getTagValue("key", eElement);
                       contents[temp][1] = getTagValue("value", eElement);
                   }
               }
           } catch (Exception e) {
               e.printStackTrace();
           }
           return contents;
           }

           private static String getTagValue(String sTag, Element eElement) {
           NodeList nlList = eElement.getElementsByTagName(sTag).item(0).getChildNodes();
           Node nValue = (Node)nlList.item(0);
           return nValue.getNodeValue();
           }
}

8. Then create a Resource.xml file in the folder D:\Resource.And in the Resource.xml copy and paste the code given below.

*Here <key></key> block refers to the key.
*Here <value></value> block refers to the value that the key block refers.


Resource.xml

<?xml version="1.0" encoding="windows-1252" ?
<bundle>
<label>
<key>MstNm_Label</key>
<value>Name</value></label>
</bundle>


9. Now we can use it in the form as a regex expression as shown simply in the text Resource on the form.
       #{bundle['Alias']}
ie. ex-#{bundle['key']}

10. To resolve the key in the bean.  


public Object resolvElDCMsg(String data) {
       FacesContext fc = FacesContext.getCurrentInstance();
       Application app = fc.getApplication();
       ExpressionFactory elFactory = app.getExpressionFactory();
       ELContext elContext = fc.getELContext();
       ValueExpression valueExp = elFactory.createValueExpression(elContext, data, Object.class);
       return valueExp.getValue(elContext);
   }

11. Now to use the Resource in the bean you can use the given code.


String message = resolvElDCMsg("#{bundle['OAMsg8.Label']}").toString();

Friday, 12 April 2013

how to populate data in ADF table from Bean using POJO | Populating af:table using ArrayList

Hi,

This post is about populating af:table from a POJO from the bean.

Suppose we have to show information related to books to the user.
So first we have to understand how we populate a table from a List.
  1. For this we have to create a dataType for storing the data of the book.
  2. For the same, we have created a Class named BookInfo. Here is the code for on the BookInfo class.

    package edittableonpojo.view.dc;
    
    public class BookInfo {
        private String bookDesc;
        private String bookAuthNm;
        private String bookSrNo;
        
        public BookInfo(String bookSrNo,String bookDesc,String bookAuthNm) {
            super();
            this.bookSrNo = bookSrNo;
            this.bookAuthNm = bookAuthNm;
            this.bookDesc = bookDesc;
        }
    
        public void setBookDesc(String bookdesc) {
            this.bookDesc = bookdesc;
        }
    
        public String getBookDesc() {
            return bookDesc;
        }
    
        public void setBookAuthNm(String bookAuthNm) {
            this.bookAuthNm = bookAuthNm;
        }
    
        public String getBookAuthNm() {
            return bookAuthNm;
        }
    
        public void setBookSrNo(String bookSrNo) {
            this.bookSrNo = bookSrNo;
        }
    
        public String getBookSrNo() {
            return bookSrNo;
        }
        
        public String getKey(){
            return this.getBookSrNo();
        }
        
        public String toString(){
            return bookSrNo+"_"+bookAuthNm+"_"+bookDesc;
        }
    }
    

  3. Then we have to create a Bean from which data will be provided to the table. In the constructer of the Bean the code is written to populate the data in the ArrayList. Here is the code of the Bean.

    package edittableonpojo.view.bean;
    
    import edittableonpojo.view.dc.BookInfo;
    
    import java.util.ArrayList;
    
    public class BookBean {
        private ArrayList<BookInfo> bookDtls = new ArrayList<BookInfo>();
    
    
        public BookBean() {
            bookDtls.add(new BookInfo("1A", "The Alchemist", "Paulo Cohelo"));
            bookDtls.add(new BookInfo("2A", "Game Of Thrones", "George R. R. Martin"));
            bookDtls.add(new BookInfo("3A", "Five Point Someone", "Chetan Bhagat"));
            bookDtls.add(new BookInfo("4A", "Harry Potter", "J.K.Rowling"));
            bookDtls.add(new BookInfo("5A", "Wings of Fire", "A.P.J Abdul Kalam"));
        }
    
        public ArrayList<BookInfo> getBookInfo() {
            return bookDtls;
        }
    }
    

  4. Now we have to create a Page where we can show the data of the List. For this, I have created a jspx page and dropped an af:table in which we will show the data and done some styling ;).
  5. The table contains three Columns
    1. Book SrNo.
    2. Author Name.
    3. Book Description
  6. In the Value attribute of the Table from the Property inspector, select the value of the attribute from the bean-like   
<af:table var="row" rowBandingInterval="0" id="t1" value="#{viewScope.BookBean.bookInfo}"
                                  rowSelection="none"
                                  inlineStyle="line-Height: 15px;">

  1. In the Columns drop af:outputText and in the value of the outputText put the value like value="#{row.bookAuthNm}" for showing the Author name , and similarly you have to put values in other rows.
  2. Here is the code of the jspx page.

    <?xml version='1.0' encoding='UTF-8'?>
    <jsp:root xmlns:jsp="http://java.sun.com/JSP/Page" version="2.1" xmlns:f="http://java.sun.com/jsf/core"
              xmlns:af="http://xmlns.oracle.com/adf/faces/rich">
        <jsp:directive.page contentType="text/html;charset=UTF-8"/>
        <f:view>
            <af:document title="untitled1.jspx" id="d1">
                <af:form id="f1">
                    <af:panelBox text="Book Details" id="pb1">
                        <f:facet name="toolbar"/>
                        <af:panelCollection id="pc1" styleClass="AFStretchWidth">
                            <f:facet name="menus"/>
                            <f:facet name="toolbar"/>
                            <f:facet name="statusbar"/>
                            <af:table var="row" rowBandingInterval="0" id="t1" value="#{viewScope.BookBean.bookInfo}"
                                      rowSelection="multiple"
                                      inlineStyle="line-Height: 15px;">
                                <af:column sortable="true" headerText="Book SrNo." id="c1">
                                    <af:outputText value="#{row.bookSrNo}" id="ot1"/>
                                </af:column>
                                <af:column sortable="false" headerText="Author Name" id="c2">
                                    <af:outputText value="#{row.bookAuthNm}" id="ot2"/>
                                </af:column>
                                <af:column sortable="true" headerText="Book Description" id="c3" width="300">
                                    <af:outputText value="#{row.bookDesc}" id="ot3"/>
                                </af:column>
                            </af:table>
                        </af:panelCollection>
                    </af:panelBox>
                </af:form>
            </af:document>
        </f:view>
    </jsp:root>
    

  3. The jspx page looks like this.
  4. Now simply run the application.
  5. After the screen that comes up is something like this.
Here is the sample application : TableOnPOJO.rar

ADF : Facebook chat implementation

I had a task in my organisation to implement facebook chat in ADF. After a lot of search on internet and found that chat for facebook can only be inplemented through smacks api. It is available at http://www.igniterealtime.org/downloads/source.jsp .

Download the sample zip application here : Facebookchat.rar


There are three java classes used for the same:


  1. "CustomSASLDigestMD5Mechanism.java" to perform the authentication.
  2. "FBMessageListener.java" to listen to the messages that comes to you from facebook.
  3. "FBConsoleChatApp.java" is the java class that contatins main method i.e. this is the class used for running the program.
GoodLuck.