Hello all,
This is a very basic post on LOV switcher implementation.
First , some background information about it.
First we need to understand what happens when a Lov is added to an attribute in ViewObject.
When we add a Lov to an attribute in a ViewObject, a property is added to the attribute
LOVName="LOV_Name"
and a viewObject instance of the Lov is added to the viewObject. You can see it in the viewAccesors tab to ViewObject. And an entry of list binding is made in the viewObject to represent attribute mapping for the LOV viewObject.
So the question is how the Framework determines if which LOV is added to the attribute, at runtime ?
At first Framework looks for the property LOVName of the attrribute of the ViewObject then looks for the List binding of the LOV name.
So inorder to switch the LOV on an attribute we just have to change the value of the LOVName in the attribute.Means we need to give it the name of the lov whichever we want to display. LOV switcher basically does the same thing.
So here is an example for the same.
Here I am creating a transient attribute in a Temporary viewObject made from dual and on this attribute we will switch Departments and Employees LOV. I have also created two viewObjects of Department and Employees to use them to make LOV.

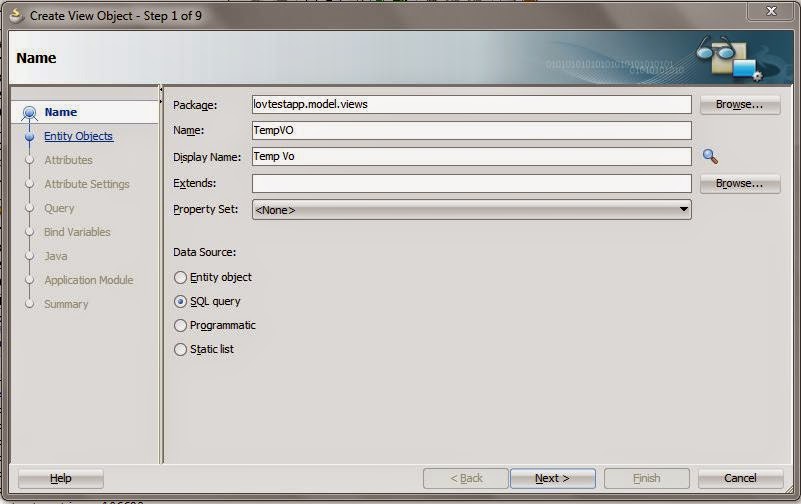
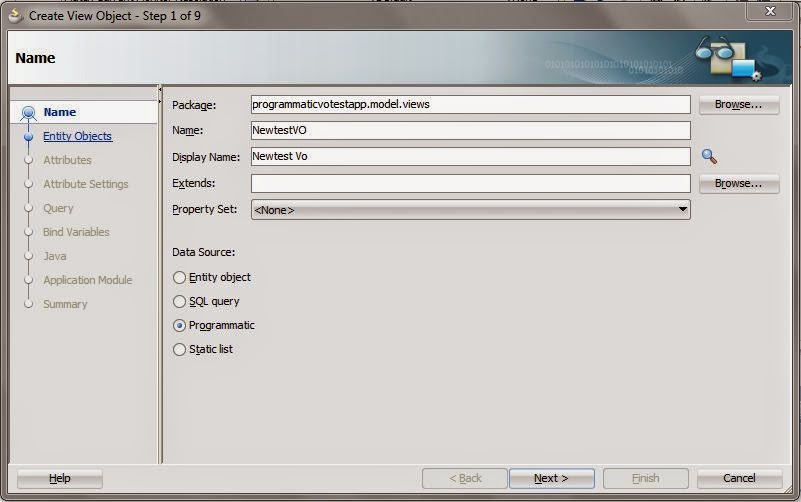
First we have to create a Temporary ViewObject with a transient attribute.
Then we will create a transient attribute in which we will put the name of the LOV and then use it will as name of the LOV which needs to be selected.
Here I am naming it as 'LovNameTrans'.

Then we will create two lov on attribute 'LovAttributeTrans'.
Here I have used 'LOVDept' as the name of the LOV.

And again am creating second LOV on the same attribute and named it 'LOVEmp'.

Now the LOV part is over now we have make the switching arrangement.
So now in the 'List of Values Switcher' select the attribute 'LovNameTrans' which will provide the name of the LOV to be switched.

Now create a page and drop the attributes.For assigning values to the 'LovNameTrans' attribute i have created a radio group with static list containing the LOV names.


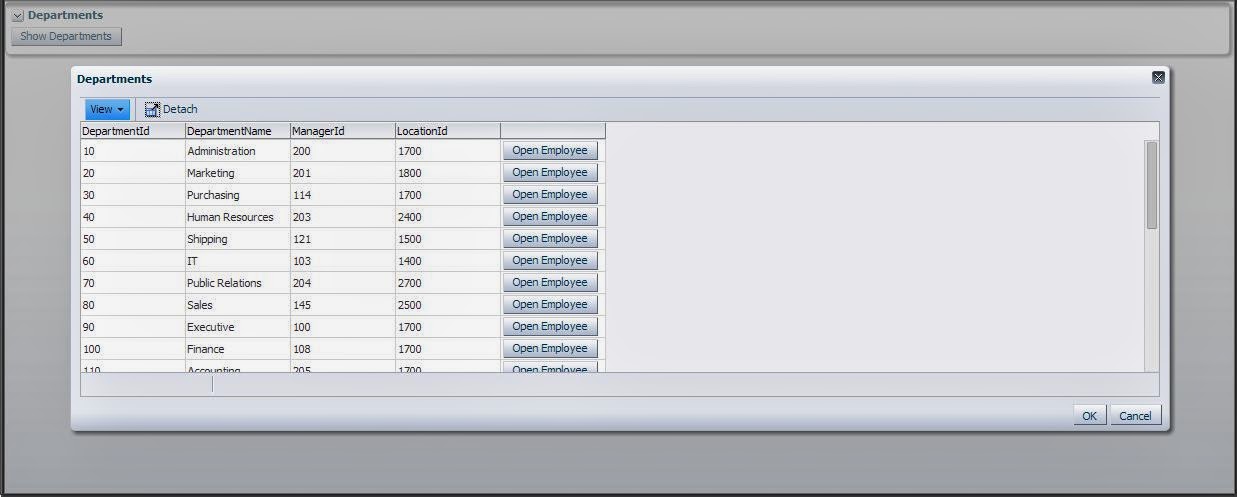
On selecting LOVDept

Here is the sample workspace used, you can download it from here :LovSwitcherApp
This is a very basic post on LOV switcher implementation.
First , some background information about it.
First we need to understand what happens when a Lov is added to an attribute in ViewObject.
When we add a Lov to an attribute in a ViewObject, a property is added to the attribute
LOVName="LOV_Name"
and a viewObject instance of the Lov is added to the viewObject. You can see it in the viewAccesors tab to ViewObject. And an entry of list binding is made in the viewObject to represent attribute mapping for the LOV viewObject.
So the question is how the Framework determines if which LOV is added to the attribute, at runtime ?
At first Framework looks for the property LOVName of the attrribute of the ViewObject then looks for the List binding of the LOV name.
So inorder to switch the LOV on an attribute we just have to change the value of the LOVName in the attribute.Means we need to give it the name of the lov whichever we want to display. LOV switcher basically does the same thing.
So here is an example for the same.
Here I am creating a transient attribute in a Temporary viewObject made from dual and on this attribute we will switch Departments and Employees LOV. I have also created two viewObjects of Department and Employees to use them to make LOV.
First we have to create a Temporary ViewObject with a transient attribute.
Then we will create a transient attribute in which we will put the name of the LOV and then use it will as name of the LOV which needs to be selected.
Here I am naming it as 'LovNameTrans'.
Then we will create two lov on attribute 'LovAttributeTrans'.
Here I have used 'LOVDept' as the name of the LOV.
And again am creating second LOV on the same attribute and named it 'LOVEmp'.
Now the LOV part is over now we have make the switching arrangement.
So now in the 'List of Values Switcher' select the attribute 'LovNameTrans' which will provide the name of the LOV to be switched.
Now create a page and drop the attributes.For assigning values to the 'LovNameTrans' attribute i have created a radio group with static list containing the LOV names.
Make sure the attribute containing the name of teh LOv have the autosubmit property as true on the page as if the value is not submitted then LOV will not be shown. And also use proper partil triggers.
Now run the page. On selecting LOVDept
On selecting LOVDept
Here is the sample workspace used, you can download it from here :LovSwitcherApp