Showing posts with label BindingContainer. Show all posts

Friday, 11 April 2014

ADF : Filtering ListOfValues Effectively, Best way to filter an LOV

Hello all,

This is an initial level post, but still thinks can get tricky at times, so i thought of sharing this.

Here I will try to demonstrate how we can filter the values of an LOV effectively.
First we need to know about what happens when an LOV is added on an attribute in a viewObject.

When a LOV is added on an attribute then an instance of the viewObject ( which is used for creating LOV ) is created and that is added to the attribute as an LOV. This instance is attached to the parent viewObject.
Let us take an example,
Suppose we have to show departments in place of department Id in EmployeeViewObject made from Employees Table.
For doing so we will have create a viewObject containing DeptId and DepartmentName, we can name it LovDeptVO. Then we will select the departmentId field in EmployeeViewObject and add LOV and select LovDeptVO viewObject and do attribute mapping , at this time an instance of viewObject LovDeptVO is created and added to EmployeeViewObject. And then you can view the instance of the lov in viewAccessors Tab of EmployeeViewObject.

So now we come to filtering the LOV on somevalues.

There are two cases :

1. Filtering LOV with the attribute present in the same ViewObject.
We have to create a viewCriteria in the lov ViewObject and pass values to bind variables from the viewObject which contains the LOV.
Let us take an example ;

I have created an ADF Applcation with HR Schema.

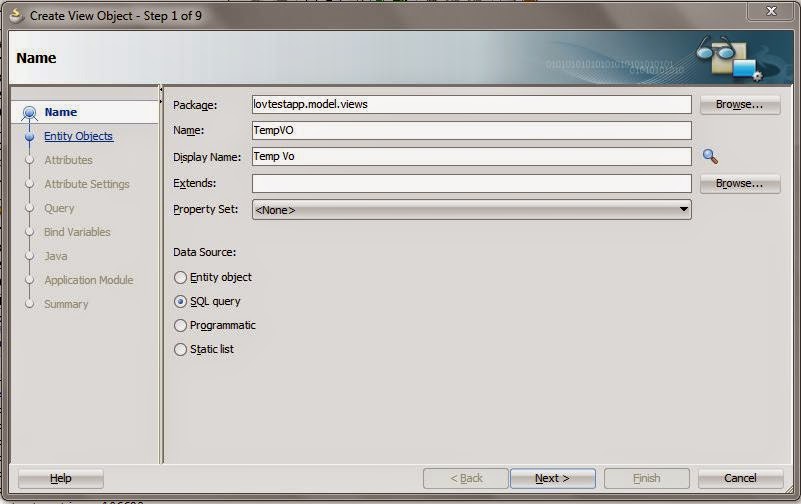
Then created a temprory viewObject containing two attributes departmentId and EmployeeId.


Then we have to create EmployeeViewObject to make LOV from it.


Now go to Query Tab and create a viewCriteria filtering the LOVEmployeeVo with DeptId. So now LOV viewObject is also complete.

Now we have to make LOV in the EmployeeId in TempVO. Select the EmployeeId attribute go to ListOfValues section and add an lov by clicking add button.

Now we have to pass the selected DepartmentID to LOV so that i can be filtered. So go to the viewAccessors tab in TempVO. You will see the LOV instance there.
Click edit and pass the values. Drag the available viewCriteia to the left and pass the value to the bindVariable.


New Create a page and drop the TempVO as a form. Set Autosubmit value of DepartmentId field to true. And add partial trigger on EmployeeId attribute to refresh the LOV when value of Department changes.


2. Filtering LOV with the attribute present outside the ViewOject i.e. filtering LOV from outside.

So in the above case we had to filter the lov from the attribute from the ViewObject containing Lov, i mean EmployeeId and DepartmentId both fields were in the same ViewObject. How will we filter when we have to filter the LOV on the basis of value coming from a diffferent ViewObject.

For this purpose i created a text field on the page and created a button to filter the LOV.
For that I have created a method in AmImpl and called it in the bean by adding it to client interface.
Method in AMImpl .
And In Bean I have called the Method in AM


On Running the application


When DepartmentId is entered as 10 and filterLov button is clicked


You can download the sample Application here : LovTestApp.rar

Monday, 7 April 2014

Validator in oracle ADF, Using af:attribute to make validation easy.

Hello all,

This post I will try to focus on how we can make validations in an editable table more effectively.

So what would we do if we have two attributes in a row in a table and we need to validate one on the basis of the other?

The answer is simple.

  • We will get the instance of the viewObject 
  • Then get the current row 
  • Then we will get the attribute with which we need to compare and then we will compare and check the validation.
This process is fine, but i have a more easy and effective way to do so.

I have created a Transient attribute in EmployeeVO where the newSalary of the Employee is to be entered. We have to make sure that the new Salary is greater than old salary.

Drag the EmployeeVO into the page. Then add an af:attribute component in the inputText of newSalaryTrans . Give attribute name and a value here i have used 'oldSal' and assigned with value of old Salary i.e. #{row.Salary}.


Now we need to implement the validation and for that I created a Validator on the NewSalaryTrans field.


In the bean I have used the code given below :


    public void newSalaryVAL(FacesContext facesContext, UIComponent uIComponent, Object object) {
        Object val = uIComponent.getAttributes().get("oldSal");
        System.out.println("New Sal is  : "+object+" Old Sal is  : "+val);
        if(val != null){
            BigDecimal oldVal = (BigDecimal)val;
            BigDecimal newVal = (BigDecimal)object;
             if(oldVal.compareTo(newVal) >=0 ){
                throw new ValidatorException(new FacesMessage("New Salary Cannnot be less than Old Salary!"));
            }
        }
    }

On putting less value in newSalaryTrans


Here is the sample example : NewValidatorTestApp


Friday, 4 April 2014

ADF : af:table or adf form or adf page taking too much time to load

During the development sometimes we come across this problem. In our case we had a table on a page and it was taking too much time to load, even though there were only one row in the database table but then also it was taking more than enough time to load. After the analysing the problem finally we were able to solved the problem.

The main problem was with the List of Values with SingleSelection which was inserted in the table. In a column we had to show the name in place of the id, so the developer created a List of Values in the viewObject and put it in the table on page. At first it was working fine but later as the number of rows grown in the List of values the list started taking time to load.

The main cause was the number of rows in the list of values. Single selection list of values matches the id with the value and shows values, so inorder to map it needs all the rows, so whenever the table was being load the ListOfValues started to fetch all the rows, and as the number of rows was too much so abviously it was taking too much time. So, we had to replace the list of values but we also had to show the name in place of id. 

So there are many ways to do that : 

1. We can include the name that we have to display in the query of the table itself, because of which we can simply display it in a column.

2. Otherwise we have to use a viewobject with query that returns a less number of rows and better if it returns one row with the id and DisplayName. 
Suppose we have to show Department Name in place of department id in Employees Table. The query will be something like this : SELECT DEPARTMENT_NAME FROM DEPARTMENTS WHERE DEPARTMENT_ID = :DeptIdBind

And then we need to show the display name so we created a transient attribute.
Then in the getter of the transient attribute, get the viewObject and pass the bindVariables and execute the query. The query will return a row and then we can fetch the name from the view object and show it by returning it.

There is a disadvantage of using this method, as the query is executed for all the rows fetched in the table. But page load problem will be solved. 

This may depend on the use case.  For us both worked well.

I will suggest never to use SingleSelection List of Values that contains large number of rows in the page. Not even on the adf form. Because due to that it will take too much time to load.

Thanks for reading. If you have any question, Please feel free to ask.

Thursday, 3 April 2014

ADF : Alternate of Current Row Selection In af:table | Using f:attribute in ADF

Today am about to show how we can get the value of the selected row from a table without using the RowSelection property of the table.

This came to my mind when I was working on an editable table on a PopUp. And the scenario was that when the user clicks on a link or button in the table then an another table on a new popup need to be shown. The other thing was that both the tables contains large number of rows.

The problem was when we were selecting the current row in table the Framework was trying to make the selected row as current, because of which it was refreshing the table.So every time I select a row the whole table was being refreshed to set selected row as current.

So I tried out some other way to to the same.

Here is the sample Application .

I have created a Application with HR Schema with Employee and Department tables. On the page I have dropped two popUps, First for department table and second for employee table.

Drag the Department table on the popup and set rowSelection to none.

Put a Command button the department table. And add an f:attribute in the commandButton and give it a name and value as department id.


Here I have used Department Id as it is the key to department table like wise you can use user primary key as key. And then you can find the row from the key.

Then on other popup drag the employee table.
In the employees table create a viewCriteria on DepartmentId.
On click on OpenEmployee button, I have used a method to get the attibute.


    public void openEmpACTION(ActionEvent actionEvent) {
        RichCommandButton ob = (RichCommandButton)actionEvent.getSource();
        Integer dept = (Integer)ob.getAttributes().get("DeptId");
        System.out.println("Dept id is : "+dept);
        OperationBinding binding = getBindings().getOperationBinding("setDeptIdInEmployee");
        binding.getParamsMap().put("deptId", dept);
        binding.execute();
        showPopup(popEmp, true);
        //   setDeptIdInEmployee
    }
    /**Method to get Binding Container*/
    public BindingContainer getBindings() {
        return BindingContext.getCurrent().getCurrentBindingsEntry();
    }

I have created a method setDeptIdInEmployee  in AMImpl and added it to client and used in the bean. Here is the code of AMImpl.


    public void setDeptIdInEmployee(Integer deptId){
        ViewObjectImpl employeesView1 = this.getEmployeesView1();
        employeesView1.setNamedWhereClauseParam("DepartmentBind", deptId);
        employeesView1.executeQuery();
    }

On running the application the following page opens

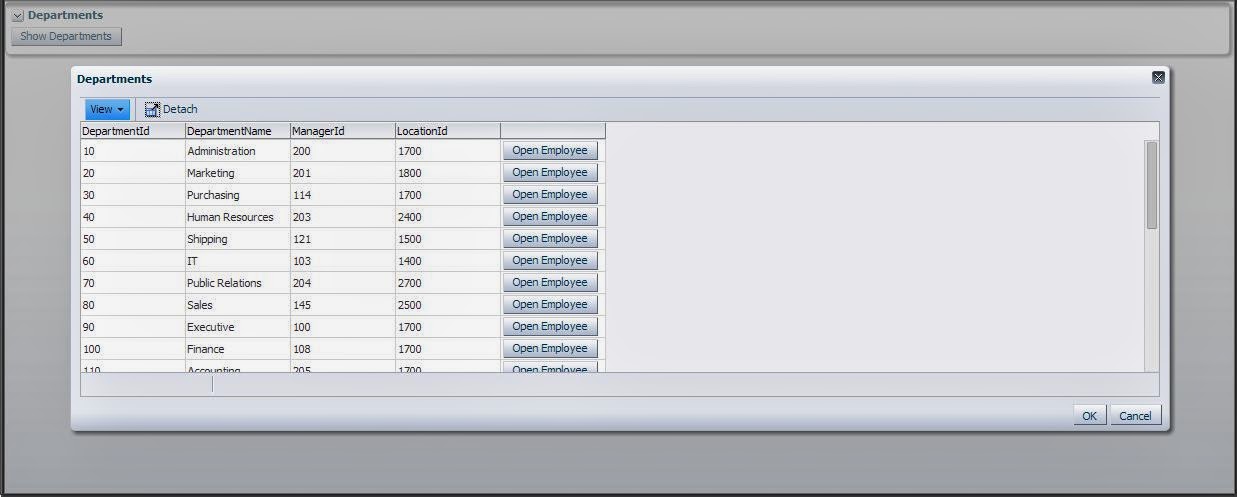
Then Click on the Show Departments button


Now click on the button open Employee and the next popUp will show Employee of Selected Department. here when clicked on Sales row
I am attaching a sample application . You can download it here  :TableOnPopupApp
Like wise you can use this to perform other operations too as now we have the select row.

Bindings in ADF

Binding provides objects to link components, it is the most innovative part of ADF after Task Flows and provides direct interaction with Appication Module. We can work with bindings in ManagedBean and also in Expression Builder. Bindings are basically used for the interaction on the model and the viewController in an ADF Application.

When we drag any DataControl on page then a binding entry is made in the pageDef of the page for that particular field. Suppose we want to Use CreateInsert operation on a button clik in the page, then we have to create the binding of CreateInsert action in the pageDef on that page and then we can use this action in our ManagedBean to perform the desired operation.

Oracle ADF provides following types of bindings:

  1. Action Binding

    Action Binding is specifically defined for a button component. Provides access to operations defined by the business object. Such as CreateInsert , Delete.
    //The code below gets the Bindings entry of the binding container and fetches the current bindings entry
     BindingContainer bindings = BindingContext.getCurrent().getCurrentBindingsEntry();
     //Gets the opertaion bindings for the method "CreateInsert"
     OperationBinding operationBinding = bindings.getOperationBinding("CreateInsert");
     //Then execute executes the method of the binding
     operationBinding.execute(); 
     
    Likewise you can use the above code to call bindings in ManagedBean.
  2. Iterator Binding
  3. When we drag tables on the page in ADF then ADF creates a IteratorBinding in the pageDef of the page. The iterator binding can be used to get the iterator of the table in the ManagedBean.
  4. Given below is the code that can be used to get the IteratorBinding in the ManagedBean.
        BindingContext btx = BindingContext.getCurrent();
        DCBindingContainer dcbct = (DCBindingContainer)btx.getCurrentBindingsEntry();
        DCIteratorBinding binding = dcbct.findIteratorBinding("StudentIterator");
        Row currentRow = binding.getCurrentRow();
  5. Here in the last line I have get the current Row from th iterator. 
    LikeWise you can use it to perform desired action. 
  6. 
    
  7. ValueBindings
    Value Bindings are created in the pageDef for all the attributes that are added on the page from the dataControl.

Java Collections , Map Interface

Map is the most important Data Structure in Java. It is used to store Key & Value pairs.
There are commonly 4 implementations of Maps :

  1. HashMap ( No Ordering on Keys or Values )
  2. TreeMap ( Ordered on the basis of Key )
  3. HashTable ( Implemented same as HashMap, except that HashTable is Synchronised . )
  4. LinkedHashMap ( It preserves the order of insertion of elements. )
  1. HashMap

    HashMap is used to store Key and Value pairs in the collection. Here is a very simple example.    


    import java.util.HashMap;
    import java.util.Map.Entry;
    
    public class SimpleHashMapTest {
        public SimpleHashMapTest() {
            super();
        }
    
        public static void main(String[] args) {
            //Create a hash map
            HashMap<Integer, String> map = new HashMap<Integer, String>();
            //add key value pairs in the hashMap
            map.put(1, "First");
            map.put(2, "Second");
            map.put(4, "Fourth");
            map.put(3, "Third");
            map.put(5, "Fifth");
            map.put(6, "Sixth");
            map.put(7, "Seventh");
            
            System.out.println("The key value pairs in HashMap are :");
            for(Entry<Integer,String> e : map.entrySet()){
                System.out.println("Key : "+e.getKey()+"        Val : "+e.getValue());
            }
            //get(key) is used to get the value at the given key
            System.out.println("Value at key : "+3+" is :"+map.get(3));
            //These methods can be used to check if the map contains the particular key or not. 
            //They return boolean
            map.containsKey(1);
            map.containsValue("Sixth");
        }
    }
    

       And the output on the console is as below.


  2. TreeMap

    TreeMap is sortedd on the basis of Key. i.e. if you want to make a key-value pair that need to be sorted on the basis of the key, then you gotta use TreeMap. Let us take an example and try to understand.
    I am taking a self-defined class Animal.class as key and will make a TreeMap. So to make a self-made class a key we need to define implement following interface.
    • Comparable ( This helps in Sorting the keys by comparing them. )
       

    public class Animal implements Comparable{
        String name;
        Integer size;
        public Animal(String name, Integer size) {
            this.name = name;
            this.size = size;
        }
    
        @Override
        public int compareTo(Object o) {
            return ((Animal)o).size - this.size;
        }
        
        public String toString(){
            return size+". "+name;
        }
    }
    
    public class TreeMapTest {
      
        public static void main(String[] args) {
            TreeMap<Animal,Integer> map = new TreeMap<Animal,Integer>();
            map.put(new Animal("Elefant", 10), 1);
            map.put(new Animal("Cat", 3), 2);
            map.put(new Animal("Tiger", 7), 1);
            map.put(new Animal("Lion", 8), 1);
            map.put(new Animal("Deer", 5), 1);
            
            //map.entrySet() gets you a sorted list of key - value pairs
            System.out.println("Sorted list :");
            for(Entry<Animal,Integer> e : map.entrySet()){
                System.out.println("Key is : "+e.getKey()+ " value : "+e.getValue());
            }
            
            // If you want a sorted in descending order you can use map.descendingMap()
            System.out.println("Descending order list :");
            for(Entry<Animal,Integer> e : map.descendingMap().entrySet()){
                System.out.println("Key is : "+e.getKey()+ " value : "+e.getValue());
            }
            
        }
    }
    

    output is  :
  3. HashTable

    HashTable and HashMap are almost same. The little difference between them is that
    • HashTable is synchronised
    • HashMap is unsynchronised
    That means HashTable is Thread safe and HashMap is not. That simply means that if so many threads are modifying a HashTable then locking is handeled by HashTable itself whereas in case of HashMap synchronisation needs to be done.
  4. LinkedHashMap

    LinkedHashMap is similar to HashMap except for the fact that LinkedHashMap maintains the insertion order of the elements in the LinkedHashMap.
    Let us take an example and try to understand.      
    public class Animal implements Comparable{
        String name;
        Integer size;
        public Animal(String name, Integer size) {
            this.name = name;
            this.size = size;
        }
    
        @Override
        public int compareTo(Object o) {
            return ((Animal)o).size - this.size;
        }
        
        public String toString(){
            return size+". "+name;
        }
    }
    
    import java.util.LinkedHashMap;
    import java.util.Map.Entry;
    import java.util.TreeMap;
    
    public class LinkedHashMapTest {
        public static void main(String[] args) {
            LinkedHashMap<Animal,Integer> map = new LinkedHashMap<Animal,Integer>();
            map.put(new Animal("Elefant", 10), 1);
            map.put(new Animal("Cat", 3), 2);
            map.put(new Animal("Tiger", 7), 1);
            map.put(new Animal("Lion", 8), 1);
            map.put(new Animal("Deer", 5), 1);
            
            //map.entrySet() gets you a list of key - value pairs
            System.out.println("List :");
            for(Entry<Animal,Integer> e : map.entrySet()){
                System.out.println("Key is : "+e.getKey()+ " value : "+e.getValue());
            }
            
           
        }
    }
    

  5. OutPut is : 

    Here you can eaisly see that the values are stored in the LinkedHashMap in the order they are inserted.                   

Wednesday, 4 December 2013

ADF : How ViewObjects (VO) get executed ? | View Object LifeCycle

View Objects are esssential part of ADF Business Components . These are associated with represention of DataSet.
ViewObjects contains a Query which when executed returns a set of results in form of rows. Then the view Object convert the rows returned from the query to ADF undestandable form i.e. ViewObjectRowImpl form.
So, the question is what happens when a viewObject gets a call?

ViewObject goes through a series of methods before representing a dataset. In other words we can name it ViewObject LifeCycle .


LifeCycle

When a viewObject is called the following methods are executed in the given sequence.
  • At first when the viewObject is first executed the method first called in the ViewObjectImpl is
    executeQueryForCollection(Object qc, Object[] params, int noUserParams)
    This method executes the Database Query in the viewObject and then calls the next method.

  • After executeQueryForCollection is executed then method hasNextForCollection(Object qc) is called. This method checks if the collection returned have a row or not. If hasNextForCollection(Object qc) returns True then the next method of the lifeCycle is called which converts the row to ADF understandable form i.e. into ViewObjectRowImpl from.

  • So when method hasNextForCollection retuns true then method createRowFromResultSet(Object qc, ResultSet resultSet) is called and this method converts the row into ADF understandable form.

  • This goes on until all the rows are covered and there is no rows left in collection. When there are no rows in the collection then the method hasNextForCollection returns false .

  • Then method setFetchCompleteForCollection(java.lang.Object qc,boolean val) is called and it sets the flag for fetch completion. This indicates that the rows from the collection are fetched.


Here is a diagrammatic representation of ViewObject LifeCycle .


Monday, 2 September 2013

Following the MVC Architecture in ADF, AMImpl method Called in Managed Bean

Hello everyone,

Here am about to explain how we can optimize our application for performance in ADF. ADF follows MVC architecture for application development.So there are times when we need an instance of model impl classes in the bean such as for example: we need AppModuleImpl in our bean class to get or fetch value from a view object. So for that we have to create an AppModuleImpl instance in the bean and then get viewObject from that.

So, if we get the AppModuleImpl object in bean then the purpose of MVC is being violated.I mean then we would be merging the model and viewController separation. And further more new instances of AppModuleImpl and etc, will created in our Managed Bean, this adds to violation of MVC Architecture . So it is better to keep the database logic in the database layer i.e. model and keep the controller logic in in viewController.

So the problem is that if we have to interact with the model layer from the bean, then how shall we do it?

The answer to this question is the use of ADF bindings.
Binding is used to interact with model layer from the viewController layer.

Suppose in a scenario, just for example we have to get the location of the employee by using EmployeeId. This needs interaction with the model layer.

So to do that we have to create a method that will take EmployeeId as input and give back location in return. 

  1. Go to the AppModuleImpl and create a method.

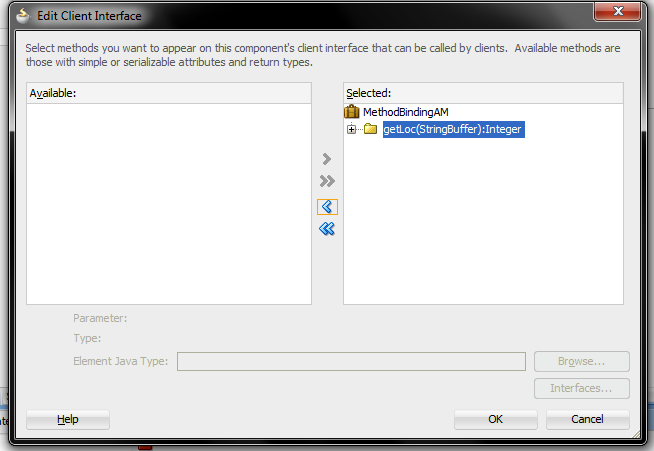
    **Please do not use "Object" type in return parameter or in inputParameter,if you do this then the method will not be shown in ClientInterface**
        public Integer getLoc(Integer EmpId){
            Integer sal = null;
            Row[] row_2 = this.getEmployee1().getFilteredRows("EmployeeId", EmpId);
            if(row_2.length>0){
                sal = Integer.parseInt(row_2[0].getAttribute("Salary").toString());
            }
            return sal;
        }


  2. Then go to clientInterface of the AM and add the method to clientInterface.


  3. Then you have to create binding for this method on the page.


  4. Now we have to call this binding and put the parameters in it from the bean.
        public void fetchSalary(ActionEvent actionEvent) {
            OperationBinding binding = getBindings().getOperationBinding("getLoc");
            // to put parameters value in the method
            binding.getParamsMap().put("EmpId", empId);
            Object execute = binding.execute();
            salary  = (Integer) execute;
        }


  5. Now when you run the application.


    and when Fetch Salary button is clicked

  6. You can download the sample application here : MethodBindingApp.rar.
  7. If you have any query regarding this, please write in the comments. 

Friday, 26 July 2013

How to use single input field to search in different columns in oracle ADF Application.

In ADF we can create search in tables using viewcriteria. ViewCriteria can be used to perform any kind of search or criteria on the ViewCriteria. The main idea behind single inputtext search is to put or operator in the viewCriteria or query, and to compare the columns with the approriate datatype. Here i have created common search for departmentId, employeeId, firstname, lastName, PhoneNumber, Salary and JobId column.

Here i have used Employee table of hr schema to demonstrate single point search on the whole table. 

So, for this simply create a simple ADF application and connect it to database using hr schema.
  1. For this we need employee view, here we are using readonly viewObject beacause we just have to display the information. Create bind variables as shown in the picture. Here i have created 6 bind variable to perform search on 7 columns of the employee table.

     
  2.  Now create a viewCriteria as shown below.

     
    <ViewCriteria
        Name="EmployeeVOCriteria"
        ViewObjectName="singleboxsearch.model.EmployeeVO"
        Conjunction="AND">
        <Properties>
          <CustomProperties>
            <Property
              Name="displayOperators"
              Value="InAdvancedMode"/>
            <Property
              Name="autoExecute"
              Value="false"/>
            <Property
              Name="allowConjunctionOverride"
              Value="true"/>
            <Property
              Name="showInList"
              Value="true"/>
            <Property
              Name="mode"
              Value="Basic"/>
          </CustomProperties>
        </Properties>
        <ViewCriteriaRow
          Name="EmployeeVOCriteria_row_0"
          UpperColumns="1">
          <ViewCriteriaItem
            Name="EmployeeId"
            ViewAttribute="EmployeeId"
            Operator="="
            Conjunction="AND"
            Value=":EmpIdBind"
            IsBindVarValue="true"
            Required="Optional"/>
          <ViewCriteriaItem
            Name="FirstName"
            ViewAttribute="FirstName"
            Operator="CONTAINS"
            Conjunction="OR"
            Value=":NameBind"
            IsBindVarValue="true"
            Required="Optional"/>
          <ViewCriteriaItem
            Name="LastName"
            ViewAttribute="LastName"
            Operator="CONTAINS"
            Conjunction="OR"
            Value=":NameBind"
            IsBindVarValue="true"
            Required="Optional"/>
          <ViewCriteriaItem
            Name="PhoneNumber"
            ViewAttribute="PhoneNumber"
            Operator="CONTAINS"
            Conjunction="OR"
            Value=":PhoneNumBind"
            IsBindVarValue="true"
            Required="Optional"/>
          <ViewCriteriaItem
            Name="Salary"
            ViewAttribute="Salary"
            Operator="="
            Conjunction="OR"
            Value=":SalaryBind"
            IsBindVarValue="true"
            Required="Optional"/>
          <ViewCriteriaItem
            Name="DepartmentId"
            ViewAttribute="DepartmentId"
            Operator="="
            Conjunction="OR"
            Value=":DeptIdBind"
            IsBindVarValue="true"
            Required="Optional"/>
        </ViewCriteriaRow>
      </ViewCriteria> 


  3. Now we need a page to display the search. So i just created a jspx page and drag the table onto it and put 1 inputTextBox and 2 buttons. 1 for search and the other for reset action. Here is the xml code of the jspx page.
    <?xml version='1.0' encoding='UTF-8'?>
    <jsp:root xmlns:jsp="http://java.sun.com/JSP/Page" version="2.1" xmlns:f="http://java.sun.com/jsf/core"
              xmlns:af="http://xmlns.oracle.com/adf/faces/rich">
        <jsp:directive.page contentType="text/html;charset=UTF-8"/>
        <f:view>
            <af:document title="untitled1" id="d1">
                <af:form id="f1">
                    <af:panelBox id="pb1" showDisclosure="false">
                        <f:facet name="toolbar"/>
                        <af:panelGroupLayout id="pgl1" layout="horizontal">
                            <af:inputText label="Search" id="it11" labelStyle="color:black;font-weight:bold;"
                                          binding="#{SingleBoxSearch.searchBox_IT_Bind}"/>
                            <af:commandButton text="Search" id="cb1" inlineStyle="font-weight:bold;"
                                              actionListener="#{SingleBoxSearch.searchACTION}"/>
                            <af:commandButton text="Reset" id="cb2" inlineStyle="font-weight:bold;"
                                              actionListener="#{SingleBoxSearch.resetACTION}"/>
                        </af:panelGroupLayout>
                    </af:panelBox>
                    <af:panelCollection id="pc1" styleClass="AFStretchWidth">
                        <f:facet name="menus"/>
                        <f:facet name="toolbar"/>
                        <f:facet name="statusbar"/>
                        <af:table value="#{bindings.EmployeeVO1.collectionModel}" var="row"
                                  rows="#{bindings.EmployeeVO1.rangeSize}"
                                  emptyText="#{bindings.EmployeeVO1.viewable ? 'No data to display.' : 'Access Denied.'}"
                                  fetchSize="#{bindings.EmployeeVO1.rangeSize}" rowBandingInterval="0"
                                  selectedRowKeys="#{bindings.EmployeeVO1.collectionModel.selectedRow}"
                                  selectionListener="#{bindings.EmployeeVO1.collectionModel.makeCurrent}"
                                  rowSelection="single" id="t1" styleClass="AFStretchWidth">
                            <af:column sortProperty="#{bindings.EmployeeVO1.hints.EmployeeId.name}" sortable="false"
                                       headerText="#{bindings.EmployeeVO1.hints.EmployeeId.label}" id="c1">
                                <af:inputText value="#{row.bindings.EmployeeId.inputValue}"
                                              label="#{bindings.EmployeeVO1.hints.EmployeeId.label}"
                                              required="#{bindings.EmployeeVO1.hints.EmployeeId.mandatory}"
                                              columns="#{bindings.EmployeeVO1.hints.EmployeeId.displayWidth}"
                                              maximumLength="#{bindings.EmployeeVO1.hints.EmployeeId.precision}"
                                              shortDesc="#{bindings.EmployeeVO1.hints.EmployeeId.tooltip}" id="it1"
                                              readOnly="true">
                                    <f:validator binding="#{row.bindings.EmployeeId.validator}"/>
                                    <af:convertNumber groupingUsed="false"
                                                      pattern="#{bindings.EmployeeVO1.hints.EmployeeId.format}"/>
                                </af:inputText>
                            </af:column>
                            <af:column sortProperty="#{bindings.EmployeeVO1.hints.FirstName.name}" sortable="false"
                                       headerText="#{bindings.EmployeeVO1.hints.FirstName.label}" id="c2">
                                <af:inputText value="#{row.bindings.FirstName.inputValue}"
                                              label="#{bindings.EmployeeVO1.hints.FirstName.label}"
                                              required="#{bindings.EmployeeVO1.hints.FirstName.mandatory}"
                                              columns="#{bindings.EmployeeVO1.hints.FirstName.displayWidth}"
                                              maximumLength="#{bindings.EmployeeVO1.hints.FirstName.precision}"
                                              shortDesc="#{bindings.EmployeeVO1.hints.FirstName.tooltip}" id="it2"
                                              readOnly="true">
                                    <f:validator binding="#{row.bindings.FirstName.validator}"/>
                                </af:inputText>
                            </af:column>
                            <af:column sortProperty="#{bindings.EmployeeVO1.hints.LastName.name}" sortable="false"
                                       headerText="#{bindings.EmployeeVO1.hints.LastName.label}" id="c3">
                                <af:inputText value="#{row.bindings.LastName.inputValue}"
                                              label="#{bindings.EmployeeVO1.hints.LastName.label}"
                                              required="#{bindings.EmployeeVO1.hints.LastName.mandatory}"
                                              columns="#{bindings.EmployeeVO1.hints.LastName.displayWidth}"
                                              maximumLength="#{bindings.EmployeeVO1.hints.LastName.precision}"
                                              shortDesc="#{bindings.EmployeeVO1.hints.LastName.tooltip}" id="it3"
                                              readOnly="true">
                                    <f:validator binding="#{row.bindings.LastName.validator}"/>
                                </af:inputText>
                            </af:column>
                            <af:column sortProperty="#{bindings.EmployeeVO1.hints.Email.name}" sortable="false"
                                       headerText="#{bindings.EmployeeVO1.hints.Email.label}" id="c4">
                                <af:inputText value="#{row.bindings.Email.inputValue}"
                                              label="#{bindings.EmployeeVO1.hints.Email.label}"
                                              required="#{bindings.EmployeeVO1.hints.Email.mandatory}"
                                              columns="#{bindings.EmployeeVO1.hints.Email.displayWidth}"
                                              maximumLength="#{bindings.EmployeeVO1.hints.Email.precision}"
                                              shortDesc="#{bindings.EmployeeVO1.hints.Email.tooltip}" id="it4"
                                              readOnly="true">
                                    <f:validator binding="#{row.bindings.Email.validator}"/>
                                </af:inputText>
                            </af:column>
                            <af:column sortProperty="#{bindings.EmployeeVO1.hints.PhoneNumber.name}" sortable="false"
                                       headerText="#{bindings.EmployeeVO1.hints.PhoneNumber.label}" id="c5">
                                <af:inputText value="#{row.bindings.PhoneNumber.inputValue}"
                                              label="#{bindings.EmployeeVO1.hints.PhoneNumber.label}"
                                              required="#{bindings.EmployeeVO1.hints.PhoneNumber.mandatory}"
                                              columns="#{bindings.EmployeeVO1.hints.PhoneNumber.displayWidth}"
                                              maximumLength="#{bindings.EmployeeVO1.hints.PhoneNumber.precision}"
                                              shortDesc="#{bindings.EmployeeVO1.hints.PhoneNumber.tooltip}" id="it5"
                                              readOnly="true">
                                    <f:validator binding="#{row.bindings.PhoneNumber.validator}"/>
                                </af:inputText>
                            </af:column>
                            <af:column sortProperty="#{bindings.EmployeeVO1.hints.HireDate.name}" sortable="false"
                                       headerText="#{bindings.EmployeeVO1.hints.HireDate.label}" id="c6">
                                <af:inputDate value="#{row.bindings.HireDate.inputValue}"
                                              label="#{bindings.EmployeeVO1.hints.HireDate.label}"
                                              required="#{bindings.EmployeeVO1.hints.HireDate.mandatory}"
                                              columns="#{bindings.EmployeeVO1.hints.HireDate.displayWidth}"
                                              shortDesc="#{bindings.EmployeeVO1.hints.HireDate.tooltip}" id="id1"
                                              readOnly="true">
                                    <f:validator binding="#{row.bindings.HireDate.validator}"/>
                                    <af:convertDateTime pattern="#{bindings.EmployeeVO1.hints.HireDate.format}"/>
                                </af:inputDate>
                            </af:column>
                            <af:column sortProperty="#{bindings.EmployeeVO1.hints.JobId.name}" sortable="false"
                                       headerText="#{bindings.EmployeeVO1.hints.JobId.label}" id="c7">
                                <af:inputText value="#{row.bindings.JobId.inputValue}"
                                              label="#{bindings.EmployeeVO1.hints.JobId.label}"
                                              required="#{bindings.EmployeeVO1.hints.JobId.mandatory}"
                                              columns="#{bindings.EmployeeVO1.hints.JobId.displayWidth}"
                                              maximumLength="#{bindings.EmployeeVO1.hints.JobId.precision}"
                                              shortDesc="#{bindings.EmployeeVO1.hints.JobId.tooltip}" id="it6"
                                              readOnly="true">
                                    <f:validator binding="#{row.bindings.JobId.validator}"/>
                                </af:inputText>
                            </af:column>
                            <af:column sortProperty="#{bindings.EmployeeVO1.hints.Salary.name}" sortable="false"
                                       headerText="#{bindings.EmployeeVO1.hints.Salary.label}" id="c8">
                                <af:inputText value="#{row.bindings.Salary.inputValue}"
                                              label="#{bindings.EmployeeVO1.hints.Salary.label}"
                                              required="#{bindings.EmployeeVO1.hints.Salary.mandatory}"
                                              columns="#{bindings.EmployeeVO1.hints.Salary.displayWidth}"
                                              maximumLength="#{bindings.EmployeeVO1.hints.Salary.precision}"
                                              shortDesc="#{bindings.EmployeeVO1.hints.Salary.tooltip}" id="it7"
                                              readOnly="true">
                                    <f:validator binding="#{row.bindings.Salary.validator}"/>
                                </af:inputText>
                            </af:column>
                            <af:column sortProperty="#{bindings.EmployeeVO1.hints.CommissionPct.name}" sortable="false"
                                       headerText="#{bindings.EmployeeVO1.hints.CommissionPct.label}" id="c9">
                                <af:inputText value="#{row.bindings.CommissionPct.inputValue}"
                                              label="#{bindings.EmployeeVO1.hints.CommissionPct.label}"
                                              required="#{bindings.EmployeeVO1.hints.CommissionPct.mandatory}"
                                              columns="#{bindings.EmployeeVO1.hints.CommissionPct.displayWidth}"
                                              maximumLength="#{bindings.EmployeeVO1.hints.CommissionPct.precision}"
                                              shortDesc="#{bindings.EmployeeVO1.hints.CommissionPct.tooltip}" id="it8"
                                              readOnly="true">
                                    <f:validator binding="#{row.bindings.CommissionPct.validator}"/>
                                </af:inputText>
                            </af:column>
                            <af:column sortProperty="#{bindings.EmployeeVO1.hints.ManagerId.name}" sortable="false"
                                       headerText="#{bindings.EmployeeVO1.hints.ManagerId.label}" id="c10">
                                <af:inputText value="#{row.bindings.ManagerId.inputValue}"
                                              label="#{bindings.EmployeeVO1.hints.ManagerId.label}"
                                              required="#{bindings.EmployeeVO1.hints.ManagerId.mandatory}"
                                              columns="#{bindings.EmployeeVO1.hints.ManagerId.displayWidth}"
                                              maximumLength="#{bindings.EmployeeVO1.hints.ManagerId.precision}"
                                              shortDesc="#{bindings.EmployeeVO1.hints.ManagerId.tooltip}" id="it9"
                                              readOnly="true">
                                    <f:validator binding="#{row.bindings.ManagerId.validator}"/>
                                    <af:convertNumber groupingUsed="false"
                                                      pattern="#{bindings.EmployeeVO1.hints.ManagerId.format}"/>
                                </af:inputText>
                            </af:column>
                            <af:column sortProperty="#{bindings.EmployeeVO1.hints.DepartmentId.name}" sortable="false"
                                       headerText="#{bindings.EmployeeVO1.hints.DepartmentId.label}" id="c11">
                                <af:inputText value="#{row.bindings.DepartmentId.inputValue}"
                                              label="#{bindings.EmployeeVO1.hints.DepartmentId.label}"
                                              required="#{bindings.EmployeeVO1.hints.DepartmentId.mandatory}"
                                              columns="#{bindings.EmployeeVO1.hints.DepartmentId.displayWidth}"
                                              maximumLength="#{bindings.EmployeeVO1.hints.DepartmentId.precision}"
                                              shortDesc="#{bindings.EmployeeVO1.hints.DepartmentId.tooltip}" id="it10"
                                              readOnly="true">
                                    <f:validator binding="#{row.bindings.DepartmentId.validator}"/>
                                    <af:convertNumber groupingUsed="false"
                                                      pattern="#{bindings.EmployeeVO1.hints.DepartmentId.format}"/>
                                </af:inputText>
                            </af:column>
                        </af:table>
                    </af:panelCollection>
                </af:form>
            </af:document>
        </f:view>
    </jsp:root> 
     
  4. The java code used to search is given below. In this i have used "employeesSearch.setNamedWhereClauseParam("NameBind", searchBox_IT_Bind.getValue());" to set the values to the bind variables.
    package singleboxsearch.view;
    
    import java.io.Serializable;
    
    import javax.el.ELContext;
    import javax.el.ExpressionFactory;
    import javax.el.ValueExpression;
    
    import javax.faces.application.Application;
    import javax.faces.context.FacesContext;
    import javax.faces.event.ActionEvent;
    
    import oracle.adf.view.rich.component.rich.input.RichInputText;
    
    import oracle.jbo.server.ViewObjectImpl;
    
    import singleboxsearch.model.SingleBoxSearchAMImpl;
    
    public class SingleBoxSearch implements Serializable {
        private RichInputText searchBox_IT_Bind;
        SingleBoxSearchAMImpl am;
    
        public SingleBoxSearch() {
        }
    
        public void setSearchBox_IT_Bind(RichInputText searchBox_IT_Bind) {
            this.searchBox_IT_Bind = searchBox_IT_Bind;
        }
    
        public RichInputText getSearchBox_IT_Bind() {
            return searchBox_IT_Bind;
        }
    
        public void searchACTION(ActionEvent actionEvent) {
            System.out.println(searchBox_IT_Bind.getValue());
            if(this.searchBox_IT_Bind.getValue() != null){
                Integer val = 0;
                try{
                    val = Integer.parseInt(this.searchBox_IT_Bind.getValue().toString()) ;
                }catch(Exception e){
                    val = -1;
                    System.out.println(e.getMessage());
                }
                ViewObjectImpl employeesSearch = this.getAppModule().getEmployeeVO1();
                employeesSearch.setNamedWhereClauseParam("NameBind", searchBox_IT_Bind.getValue());
                employeesSearch.setNamedWhereClauseParam("PhoneNumBind", searchBox_IT_Bind.getValue());
                employeesSearch.setNamedWhereClauseParam("JobIdBind", searchBox_IT_Bind.getValue());
                if(val != -1){
                employeesSearch.setNamedWhereClauseParam("EmpIdBind", val);
                employeesSearch.setNamedWhereClauseParam("DeptIdBind", val);
                employeesSearch.setNamedWhereClauseParam("SalaryBind", val);
                }
                employeesSearch.executeQuery();
            }
        }
    
        public void resetACTION(ActionEvent actionEvent) {
            this.searchBox_IT_Bind.setValue(null);
            ViewObjectImpl employeesSearch = this.getAppModule().getEmployeeVO1();
            employeesSearch.setNamedWhereClauseParam("NameBind", null);
            employeesSearch.setNamedWhereClauseParam("EmpIdBind", null);
            employeesSearch.setNamedWhereClauseParam("DeptIdBind", null);
            employeesSearch.setNamedWhereClauseParam("PhoneNumBind", null);
            employeesSearch.setNamedWhereClauseParam("JobIdBind", null);
            employeesSearch.setNamedWhereClauseParam("SalaryBind", null);
            employeesSearch.executeQuery();
        }
        public SingleBoxSearchAMImpl getAppModule(){
            if(am == null){
                am = (SingleBoxSearchAMImpl)resolvElDC("SingleBoxSearchAMDataControl");
                return am;
            }else{
                return am;
            }
        }
        public Object resolvElDC(String data) {
            FacesContext fc = FacesContext.getCurrentInstance();
            Application app = fc.getApplication();
            ExpressionFactory elFactory = app.getExpressionFactory();
            ELContext elContext = fc.getELContext();
            ValueExpression valueExp =
                elFactory.createValueExpression(elContext, "#{data." + data + ".dataProvider}", Object.class);
            return valueExp.getValue(elContext);
        } 
    } 
     
  5. Now run the application and search in the page. Here i have search with dept id 50, means search all the employees whose deptId is 50.

  6. Here i have search for name.

  7. Here i have searched for salary 2600.

  8. You can download sample application from here : SingleSearch.jar