This is a followup post on how we can create an ADF Page based on the business components created in my last post. https://adfjavacodes.blogspot.com/2019/12/creating-first-oracle-adf-application.html
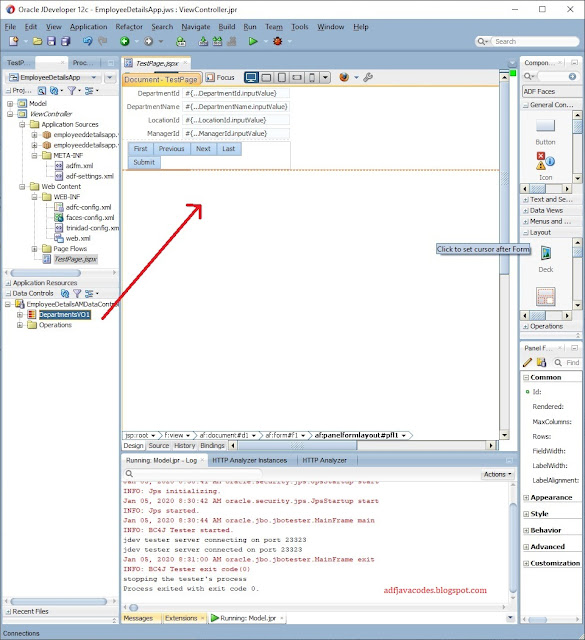
1. Create a page by using clicking on the new Page in the ViewController project.

2. Enter the page name and select the Document type. The document type can be of two types
a. Facelets (JSF Pages)
b. JSP XML (JSP Pages).
Here we are using JSPX.

3. From the data control Drag and drop the view object instance on the page.
4. Selecting Row navigation to create First, Next, Previous, Last buttons automatically.

6. From the Data control Drag and drop Commit and Rollback buttons to Commit and rollback the transactions.

7. After that drag and drop the data control on the page in form of a table.

8. Select the highlighted options.
a. Enable Sorting (To enable inbuilt sorting in the table)
b. Enable Filtering (To enable inbuilt sorting in the table)
c. Read-only Table (To create a read-only table where editing in table cannot be done)

9. Drag and drop the delete button from Data Control to delete the record.

10. Now run the Application.

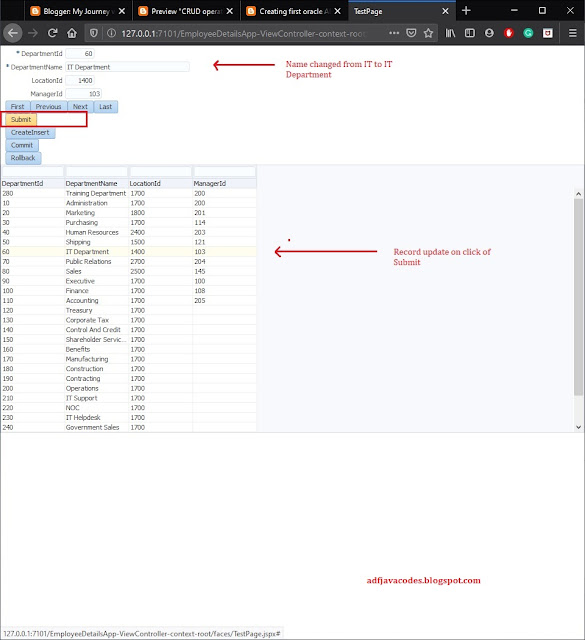
11. The Application will open up in a browser. The Page contains two parts. Form view where the user will do the DML Operation and Table view to view the total records.

12. To create a record click on the createInsert button. It will create a blank record and insert into the view object.

13. A blank record will be created.

14. Fill the relevant values and commit the data.


15. The record is saved and can be viewed in the table.

16. Now we have to edit a record, here we select the Department IT for editing. After edit, we click on Submit Button to submit the record and click on commit to save the record.


16. Now we have to check deletion. So select the record and click on the delete button and then click on the commit button to save the record.

If you have any confusion please let me know :)
1. Create a page by using clicking on the new Page in the ViewController project.

2. Enter the page name and select the Document type. The document type can be of two types
a. Facelets (JSF Pages)
b. JSP XML (JSP Pages).
Here we are using JSPX.

3. From the data control Drag and drop the view object instance on the page.
4. Selecting Row navigation to create First, Next, Previous, Last buttons automatically.

5. Now as you can see the form is created with navigation buttons.
6. From the Data control Drag and drop Commit and Rollback buttons to Commit and rollback the transactions.

7. After that drag and drop the data control on the page in form of a table.

8. Select the highlighted options.
a. Enable Sorting (To enable inbuilt sorting in the table)
b. Enable Filtering (To enable inbuilt sorting in the table)
c. Read-only Table (To create a read-only table where editing in table cannot be done)

9. Drag and drop the delete button from Data Control to delete the record.

10. Now run the Application.

11. The Application will open up in a browser. The Page contains two parts. Form view where the user will do the DML Operation and Table view to view the total records.

12. To create a record click on the createInsert button. It will create a blank record and insert into the view object.

13. A blank record will be created.
14. Fill the relevant values and commit the data.


15. The record is saved and can be viewed in the table.

16. Now we have to edit a record, here we select the Department IT for editing. After edit, we click on Submit Button to submit the record and click on commit to save the record.


16. Now we have to check deletion. So select the record and click on the delete button and then click on the commit button to save the record.

If you have any confusion please let me know :)
No comments:
Post a Comment